![]() The Tallis Toolset
The Tallis Toolset
![]() The Tallis Toolset
The Tallis Toolset
The figure below is a screen capture of Tallis Composer 1.4.
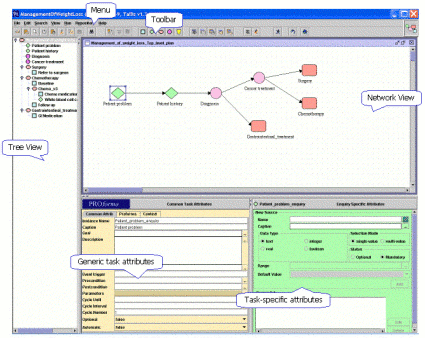
Process-descriptions are displayed in Tallis both in a network view and in a tree view:
You can view and edit task properties in the Task Properties window.
The hierarchy of a process-description is based on plans: each plan defines a new level in the hierarchy.
The Process-Description Properties (Guideline Information) dialog opens automatically when you create a new process-description. Its aim is to give users general information about the process-description (title, subject, description, category, source used, author, country of origin, publisher).
Additionally, this dialog provides some technical information (creation date, modified date, file size).
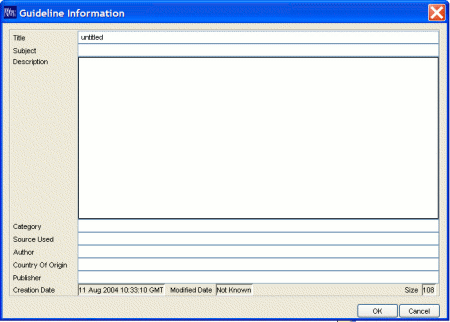
You can access this dialog by selecting File > Properties.
On the Tallis toolbar are buttons for the different task types:
![]()
To insert a task, click on the requested task button and then click in the network area to place the task.
Select the task you want to copy by clicking on it.
Select Edit > Copy (you can also right click on the task and select Copy from the pop-up menu, or click the Copy button on the toolbar ![]() ).
).
Navigate to the plan in which you want to paste the task.
Select Edit > Paste (you can also right click in the network area and select Paste from the pop-up menu, or click the Paste button on the toolbar ![]() ).
).
The mouse cursor changes from Arrow to Insert. Click in the network area to place the copied task.
You can copy and paste several tasks at a time. To select more than one task, click in the network area and drag over the tasks to form a selection rectangle.
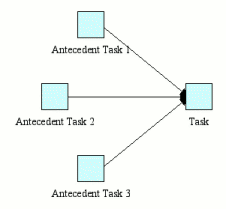
Scheduling constraints appear as black arrows in Tallis Composer. A scheduling constraint between two tasks means that the second task only executes after the first task – the antecedent task – is completed. If the antecedent task is discarded, the second task is discarded as well.
To create a scheduling constraint, place the cursor above the first task. Two yellow squares appear on the task.

Click on one of the squares, and drag over the second task. Two yellow squares appear on the task – release the mouse key above one of them.
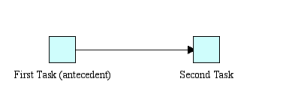
A scheduling constraint arrow is formed between the two tasks.
Note: If a task has several antecedent tasks, it executes only after all of them have been executed and if at least one of them has completed.
An enquiry can hold several requests for data, each known as a source.
Sources are based on data definitions. When you create a source from scratch, Composer creates a new data definition for it by default. To create a Source from scratch, enter the following information:
| Name | An alphanumeric string representing the source’s ID (e.g.: Symptoms). |
| Caption | The caption is displayed to the end-user when the enquiry is enacted (e.g.: What are the patient’s symptoms?) |
| Data Type | The collected data can be of one of four types: text (string), integer, real, or boolean (e.g.: Symptoms could be of type Text) |
| Range | The collected data can be of a limited range of values (i.e., the end-user will have to select one of these predefined values; e.g.: Symptoms could be: Headache, Nausea, Vomiting, Sensitivity to light) |
| Default Value | The collected data can have a default value. The default value is used to pre-populate the data entry dialogue box when the enquiry is enacted. |
| Selection mode | When range values of a source are mutually exclusive, only one of them should be selected. If the end-user has to select one value, selection mode should be set to single-value. If the end-user can select more than one value, the selection mode should be set to multi-value (multi-selection is only available for sources with range values). |
| Status | The status of a source determines the behaviour of the enquiry during enactment. When the status is mandatory, the enquiry remains in progress until all the data is collected and only then completes. When the status is optional, the enquiry completes as soon as all the mandatory sources are given values. |
When all the data is entered, click Add.
The new source will be added to the Source list.
You can use existing data definitions to create a new source. Click the button to the right of the Name field ![]() . The Data Definition List dialog appears.
. The Data Definition List dialog appears.
Select the data definition on which you want to base your source, and click OK. The Data Definition properties will populate all the fields accept for Status.
Select the appropriate status, and click Add.
The new source will be added to the Source list.
Decisions are tasks in which a choice is made between several different options, known as candidates. PROforma supports decision-making through a mechanism for generating arguments that may be either for or against a given candidate.
To create a new candidate, enter the following information:
| Name | An alphanumeric string representing the candidate’s ID (e.g.: ReferToGeneticist) |
| Description | A text string displayed to the end-user as one of the decision options when the decision is enacted (e.g.: The patient is eligible for referral to a geneticist) |
| Priority | An integer value representing the a-priori importance of the candidate (if several candidates have the same netsupport, candidate priority is used to determine the order in which they are displayed to the end user). |
When all the data is entered, click Add.
The new candidate will be added to the Candidate list.
Next, you have to add arguments for (or against) the candidate. To do this, select the Arguments tab.
The top drop-down box contains a list of the decision’s candidates. Select the candidate for which you want to define arguments, and enter the following information:
| Description | A text string displayed to the end-user during enactment (to represent the argument). If there is no description, the condition is displayed instead (e.g.: Blood pressure is lower than 120). |
| Condition | A truth-valued expression that represents the circumstances under which the argument applies (e.g.: blood_pressure < 120) |
| Support | The support that the argument offers if the condition is true. The four categories of symbolic support are:
|
When all the data is entered, click Add.
The new argument will be added to the Arguments list.
When a decision is enacted, the condition and the support properties are used by the engine to determine the effect of each argument and in turn the value of the net support for a given candidate. A recommendation rule is then used to determine whether or not a particular candidate is recommended.
To define the recommendation rule for the candidate, select the Decide tab.
Select the candidate for which you want to define a recommendation rule from the drop-down box. The Rule field is pre-populated with a default decision rule expression: netsupport(CurrentDecision, CurrentCandidate) >= 1
The default rule states that for the candidate to be recommended, its aggregated support (or “netsupport”) has to be greater than or equal to 1. The recommendation rule can hold any truth-valued expression.
Note: Selecting Unlocked in the Rule Input Mode field resets the recommendation to the default rule.
Linking is best applied when you want to access the same task functionality from more than one place in your process-description.
Linked tasks share a common task definition, and therefore the values of most task properties. Consequently, when the properties of one task are modified, the other task’s properties are updated accordingly. However, certain properties are specific to task instances, and they can have different values:
You can only link tasks that are contained within different plans - tasks that belong to the same plan cannot be linked. Furthermore, you can only link tasks of the same type.
To link one task to another, select the task you want to link. Note that The values of the task properties of this task will be replaced with the values of the task properties of the task you will link to.
Select Edit > Link to Task (you can also click Link to Task on the pop-up menu, or click the Link to Task button on the toolbar ![]() ).
).
A dialog appears containing all linkable tasks. Select the task that you want to link to, and click OK. The task’s name will be set so that both tasks now have the same name.
Note: You can create a copy of an existing task without sharing task properties by using Copy & Paste.
You can insert an existing process-description into the process-description you are currently working on. The existing process-description is inserted as a plan.
Insert a keystone into your current process-description. This keystone will eventually be replaced by a plan, which will contain the inserted process-description.
To insert a locally saved process-description, click the Load Local Process-Description As Component ![]() button on the toolbar (or right click and select Local Import from the pop-up menu).
button on the toolbar (or right click and select Local Import from the pop-up menu).
To insert a web repository process-description, click the Load Repository Process-Description As Component ![]() button on the toolbar (or right click and select Web Repository Import from the pop-up menu).
button on the toolbar (or right click and select Web Repository Import from the pop-up menu).
Select the requested process-description, and click Open (or Load).
The keystone is replaced with a plan that takes its name from the top-level plan of the inserted process-description.
An error message appears if there are conflicts between the current process-description you are working on and the process-description you are trying to insert, such as identical task names in the two processes. You need to resolve any such conflicts before inserting the process-description.
Before enacting a process-description you can search for syntactic and basic semantic errors in the process by using the Verify tool.
Select Run > Verify (or click the Verify button on the toolbar ![]() .
.
The Process-Description Verification Report dialog appears. In the upper panel is a list of all the tasks containing errors. The lower panel displays error details for the selected task. When you select a task in the dialog, it is also selected in the work area (tree & network). The report dialog is modeless; it can remain on screen while you make the necessary changes to your process-description; click Update to re-verify the process-description. The Cancel button closes the report dialog.
You can test and debug a process-description by running it in the Tallis Tester.
Select Run > Run In Tester (or click the Run In Tester button on the toolbar ![]() ).
).
The process-description is first verified. If no errors are found, the Tallis Tester is launched and the process-description is enacted.
Note:
You can enact a process-description in a web browser by submitting it to a web enactment server.
If you have one or more enactment servers set up, you can run the current process-description on the default enactment server by selecting Run > Run in Web Browser (Default Enactment Servers) (or by clicking the Run in Web Browser button on the toolbar ![]() .
.
To select between multiple enactment servers, select Run > Run In Web Browser…. The Enactment Servers dialog appears. From the drop-down list box, select the server configuration with which you want to run the process-description, and click Enact.
When you select a task in the process-description, the values of its properties are displayed in the Task Properties window. The title bar displays the task’s type and instance name.
Task properties can be categorised into four groups: general, task specific, scheduling, and runtime.
Properties that differentiate the task from other tasks of the same type:
| Instance Name | An alphanumeric string representing the ID of the task. |
| Caption | A textual label that appears in the tree view and network view of the Composer; and as the task’s label when executing via the Tallis Engine. |
| Goal | A truth-valued expression indicating the intention of the task. |
| Description | A textual description of the task. |
Properties that differentiate between tasks of different types:
| Procedure | Defines the detailed action to perform. The Trigger List displays event triggers of other tasks in the same parent-plan. You can create a hyperlink that will in runtime enact one of these tasks by invoking its event trigger: Type a text string in the edit-box, select it, and then select the appropriate trigger. The View Mode can be either Plain Text (for entering ASCII text) or HTML (for entering HTML via an HTML editor). |
| Sources | Define the data items for which values must be supplied. Use this panel to create sources by linking to existing data definitions or by creating new ones. |
Candidates tab |
Candidates define the options to choose between. Use this tab to enter the names, descriptions, and priorities of the decision candidates. |
Sources tab |
Sources defined in this tab must be supplied with values before the decision is enacted. |
Arguments tab |
PROforma supports decision-making through a mechanism of generating arguments for and against candidates. Use this tab to define arguments for each candidate. |
Decide tab |
When a decision is enacted, the condition in the Recommendation Rule field determines whether or not a candidate is recommended. |
Properties tab |
Support Type determines the structure of the Support field in the Arguments tab.
Candidate Selection determines whether only one candidate (Single Selection) or more than one (Multiple Selection) can be selected during runtime. |
| Abort Condition | A truth-valued expression indicating the conditions under which the task should abort. Once this condition is met, the plan’s state is set to discarded. All tasks within the plan that have not been completed are discarded as well. |
| Terminate Condition | A truth-valued expression indicating the conditions under which the task should terminate. Once this condition is met, the plan’s state is set to completed. All tasks within the plan that have not been completed are discarded. |
As it is a temporary placeholder, the Keystone doesn’t have task-specific properties.
Properties that determine when a task should be enacted
| State trigger | A truth-valued expression indicating a condition that has to be met before the task can be enacted. As long as it isn’t met, the task remains dormant. |
| Event trigger | An alphanumeric string that enables the end-user to trigger a task during the enactment of the process-description. The event trigger is useful for creating processes that are not linear. During the enactment of the process-description, the end-user is able to decide which path to take by triggering the relevant task. |
| Precondition | A truth-valued expression indicating a condition that has to be met before the task can be enacted. A task’s precondition is examined when, and only when, its scheduling constraints are met. If at that moment the precondition is false, the task is discarded. |
Properties that affect the enactment scheme of the task
| Cycle until | An expression defining the conditions under which a task stops cycling. |
| Cycle Interval | An integer defining the time interval between cycles (the default time unit is hours). |
| Number of cycles | An integer defining the number of times a task is repeated. |
| Optional | A task that is optional isn’t necessary for the completion of the guideline. By default, tasks are not optional. This means that their patent-plan can complete only if the task is completed or discarded. If a task is optional, its parent-plan can complete even if the task is dormant. |
| Automatic | A task that is automatic doesn’t request end-user confirmation. This property is only applicable to actions and decisions. |
| Postcondition | An assertion (expression) that is executed when the task has been performed (typically used for assigning a value to a data item – to specify information that is used by subsequent tasks. |
Displays the task properties in PROforma code (read-only).
The context tab is used to define parameters that provide further control over the enactment process (e.g. configuration parameters for data access, web enactment user interface, etc.)
The Expression Editor is accessible from every field in the task properties window that contains an expression (e.g., State Trigger, Precondition, Cycle Until). To display it, click on the ellipsis (…) button to the right of the field.
The figure below is a screen capture of the Expression Editor:

Expressions are typed in the Condition field.
You can add functions to the Condition field by double-clicking the function buttons. Function buttons have two modes:
The placeholders and what they stand for:
You can add data items or data item values to the Condition field by double-clicking a selected item. The Range Values list displays the values of the selected data item.
You can add decisions or candidates to the Condition field by double-clicking a selected item. The Candidates list displays the candidates of the selected decision.
The Data Definition Manager manages all the data definitions of a process-description. It can be used to add, edit and delete data definitions.
To access the Data Definition Manager, Select View > Process Data Definitions (or click the Data Definition Manager button on the toolbar ![]() ).
).
The figure below is a screen capture of the Data Definition Manager:
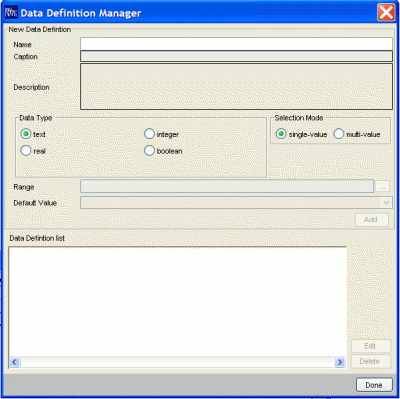
The top panel is used for adding new data definitions.
| Name | An alphanumeric string representing the source’s ID (e.g.: Symptoms). |
| Caption | The caption is displayed to the end-user when the enquiry is enacted (e.g., What are the patient’s symptoms?) |
| Data Type | The collected data can be of one of four types: text, integer, real, or boolean (e.g., Symptoms could be of type Text) |
| Range | The collected data can be of a limited range of values (i.e., the end-user will have to select one of these predefined values; e.g.: Symptoms could be: Headache, Nausea, Vomiting, Sensitivity to light) |
| Default Value | The collected data can have a default value. The default value is used to pre-populate the data entry dialogue box when the enquiry is enacted. |
| Selection mode | When range values of a source are mutually exclusive, only one of them should be selected. If the end-user has to select one value, selection mode should be set to single-value. If the end-user can select more than one value, the selection mode should be set to multi-value (multi-selection is only available for sources with range values). |
The lower panel displays the data definitions. Use the Edit and Delete buttons to the right of the list to manage the data definitions.
Data definitions that are not used by sources are not saved with the process-description.
Data definitions can be saved separately in data definition libraries (.dd files) to facilitate reuse.
Data definitions can be imported into a process-description either from a library, or from another process-description.
To save data definitions locally, Select File > Save Data Definitions > Locally (or click the Save Data Definitions button on the toolbar ![]() ).
).
To save data definitions to a web repository, select File > Save Data Definitions > To Web Repository (or click the Save Data Definitions to Web Repository button on the toolbar ![]() ).
).
Enter a name for the data definition library, and click Save.
To load locally saved data definitions, select File > Load Data Definitions > Locally (or click the Load Data Definitions button on the toolbar ![]() ).
).
To load data definitions from a web repository, select File > Load Data Definitions > From Web Repository (or click the Load Data Definitions from Web Repository button on the toolbar ![]() ).
).
Select a data definition library (.dd file) or a process-description (.pf file), and click Open (when importing locally) or Load (when importing from a web repository).
All the data definitions from the library or the process-description will be available for use in your current process-description. You can view them in the Data Definition Manager.
You can enact a process-description in a web browser by submitting it to either a local or a remote web enactment server.
Select Run > Configure Web Enactment Servers (or click the Configure Web Enactment Servers button on the toolbar ![]() ).
).
The Enactment Servers Configuration dialog appears. Click Add to add a new sever configuration.
In the Add Server Configuration dialog, enter the server URL (e.g.: www.openclinical.org), and the enactment application (e.g.: newkpc).
Click OK to confirm the Add Server Configuration dialog.
The first server configuration that is added automatically becomes the default server configuration. It will be the configuration used when running a process-description in a web browser. You can make any configuration the default one by selecting it and clicking Set as Default.
Click OK to confirm the Enactment Servers Configuration dialog.
You can use a web repository server to share process-descriptions with other users.
Select Repository > Configure Repository Servers.
The Repository Servers Configuration dialog appears. Click Add to add a new sever configuration.
In the New Repository Server Configuration dialog, enter the Server URL (e.g.: www.openclinical.org) and the Repository Application (e.g.: newRepositoryService). You can enter the User Name and the Password now, or when you first log in.
Click OK to confirm the New Repository Server Configuration dialog.
The first server configuration that is added automatically becomes the default server configuration. It will be the selected configuration in the drop-down list box of the Repository Login dialog. You can make any configuration the default one by selecting it and clicking Set as Default.
Click OK to confirm the Repository Servers Configuration dialog.
Note: To access the Guest account on the www.openclinical.org newRepositoryService type Guest for User Name and testpass for Password (all users have read and write access to files in this account).
The Repository Explorer can be used to manage repository files and folders, and to enact repository process-descriptions on a server.
To access the Repository Explorer, select Repository > Explorer.
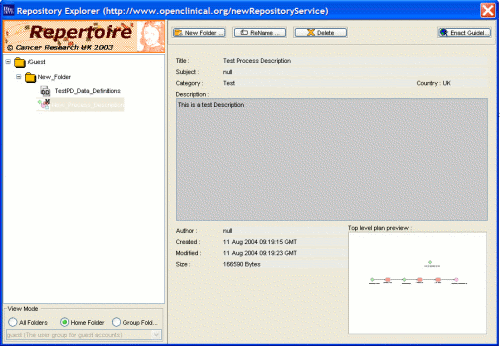
The figure below shows the Repository Explorer. The left panel contains a list of the files and folders in the repository. This list can be filtered by the View Mode radio-buttons to display:
Object nodes in the repository tree can be of two types:
When you select a process-description file, the file details are displayed in the right panel.
To enact a process-description, select it and click Enact Guidel…. Use the New Folder, Rename and Delete toolbar buttons to manage files and folders.
