Tallis PROforma Primer
Rory Steele & John Fox (December 2002)
Contents
The PROforma lifecycle and development tools
Further points on task specification
PROforma worked example 1 – “Hello World”
PROforma worked example 2 – “Cancer Diagnosis”
Introduction
PROforma is a language for describing the activities that are to be carried out by some agent to achieve particular objectives in some situation, possibly under various kinds of practical constraints (e.g. timing, resources or information constraints). It combines features of a specification language as developed in software engineering, and a knowledge representation language as developed in Artificial Intelligence.
The basic concepts that PROforma provides for encoding these activities are tasks. The main types of tasks that are supported in PROforma are shown below in Figure 1.
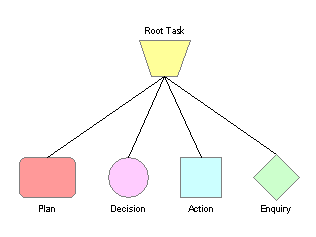
Enquiries and Actions are the most primitive units of an activity; they are used to represent (and implement) the basic interactions between a PROforma application and its environment. An example of an “action” task is a request to a human user to give a patient an injection; other kinds of action may also be carried out directly, through a physical device for instance. An “enquiry” is any process that obtains information about the environment. An enquiry might request information from a user, retrieve information from a patient database, or extract features from an image, for example.
PROforma Decisions and Plans are more complex, and in many respects are the source of “intelligence” offered by the PROforma technology.
A “decision” is any kind of choice, such as a choice among alternative interpretations of situations or events, or alternative actions or plans to achieve particular goals. PROforma supports decision-making through a mechanism for generating reasons for and against choice options (which are called decision “candidates” in PROforma parlance). We call these reasons “arguments” to emphasise their logical role in decision-making, though arguments can also use numeric weights to represent the strength of an argument for and against alternative interpretations or actions.
“Plans” are collections of tasks that are to be carried out over time or according to a predefined schedule, or in response to events, or a mixture of these. A plan can be thought of as a container for a collection of actions, enquiries, decisions and (sub)plans which are designed to work together to achieve some goal. Because a plan can contain other plans this means that PROforma can be used to construct indefinitely complex activities, represented as trees of plans.
The PROforma method of modeling expertise described below uses the explicit task ontology shown in Figure 1. The PROforma development tools support specification of procedures based on this core ontology of tasks.
The PROforma lifecycle and development tools
1. Task Analysis
Task analysis is the development of a model of expertise by setting out a collection of decisions, plans, actions and enquiries that are required in order to achieve a goal e.g. the tasks that need to be carried out in a medical care plan. The four classes of task appear to be sufficient to model many, perhaps most, clinical processes.
Note: In fact the task ontology is not specific to medicine and experiments suggest that PROforma may be able to represent processes in many other domains as well, though most experience to date has been limited to medical applications.
PROforma tasks can be connected up to form networks, which set out the constraints on the process that is required to achieve an objective. These constraints may be simple ordering constraints (e.g. “it is not permitted to begin treatment until a diagnosis has been established”) or constraints on timing (e.g. “monitoring should begin within 2 weeks of completing therapy”). A PROforma task network is sometimes called a “workflow”.
Figure 2 shows part of a task network from a (simplified) protocol for cancer diagnosis and treatment. The work flows from left to right. It begins with an enquiry about the patient’s problem (diamond at left of center panel), which in the example is unexplained weight loss.
The enquiry is followed by a diagnosis decision, shown as a circle. Remember a decision is any kind of choice, and in this case the diagnosis decision is a choice among a number of diseases that might be the cause of the weight loss. If cancer is diagnosed the workflow continues with a second decision, whether to treat the cancer with chemotherapy or surgery. Depending on the decision, the workflow is completed by enacting the appropriate treatment plan.
Recall that PROforma plans decompose into other tasks. Figure 2b shows the tasks that compose the chemotherapy task, which is a simple sequence of actions.
2. Detailed task specification
A task analysis of this kind is just a “design sketch” of the process we are interested in and is not sufficient to build a complete application since the detailed knowledge that is required to enact each component task must be provided. This is carried out in the next step of the PROforma method.
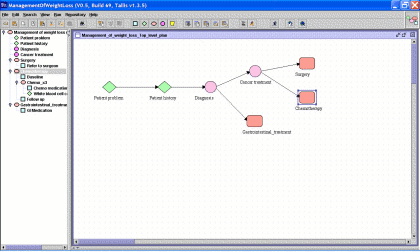
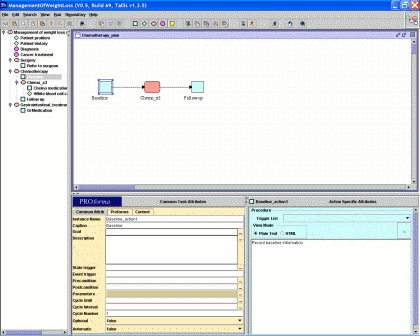
The PROforma task ontology is effectively a set of reusable components to simplify the development of applications. Once tasks have been composed into the desired network the details of each task are filled in, using a simple editor for each type of task. Figure 3 shows two of these editors. They use a tabular format consisting of “slots” for entering the values of task attributes, in this case for the “chemotherapy” plan and “diagnosis?” decision from the application in Figure 2a.
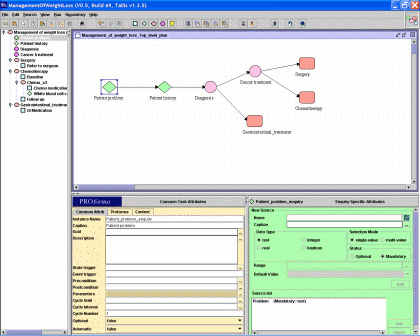
The complete authoring system display consists of several windows or panels. One of these is the sketch panel we saw earlier, with further panels providing the slots where details of each task can be added. Figure 3 shows the display being used to enter details for the first enquiry task in the application.
Different versions of the authoring system are laid out differently, but in the Java version there are two sections side by side. On the left side is a set of slots where the author can enter values for the generic attributes that all tasks share (goals, preconditions etc.) together with several slots that are needed for technical purposes, which are not strictly part of the expertise model (internal task identifier, textual description of the task).
On the right hand side is a set of fields that represent the distinguishing attributes of each type of task. For example:
- Each enquiry has fields for defining the data that the enquiry will request (e.g. patient age, sex etc)
- Each decision has slots for defining the candidates that the decision is to choose between, the logical conditions which are to be evaluated in formulating arguments for and against the options, and the criteria for choosing specific candidates.
- Every plan has slots that define its component tasks, scheduling constraints (see below), abort conditions and termination conditions.
- Each action has a procedure that is the detailed action you wish this task to perform. This may include a simple message, or perhaps an instruction to some external device.
The PROforma tools greatly simplify the definition of a task model and collectively provide an expressive way of formalizing individual tasks and complex plans and schedules.
Further points on task specification
The next section presents some simple worked examples using these tools, but before we look at them we need a little more detail on some of the concepts that we will encounter.
| Scheduling constraints | We often need to specify that a pair of tasks should be carried out in a particular order, for which we use the concept of a scheduling constraint, represented by an arrow in the task network. The arrow basically means “you can’t start the task at the head of the arrow until the task at the tail of the arrow has been completed”. Actually a task can have any number of scheduling constraints on it. For example we might want to specify that we can only take a diagnosis decision when we have completed two enquiry tasks, one requesting demographic information about a patient, say, and the other requesting information about symptoms and other clinical information. |
| Wait-conditions | Wait-conditions could be considered the superclass of scheduling constraints in that the task is only activated upon the fulfilment of this condition. Any dataitem or task property can be used within the expression. A scheduling constraint simply then becomes a wait condition that only becomes true when the task in question has a state equal to ‘completed’. |
| Pre-conditions | All tasks can have preconditions, which are checked at the point where a task is being considered for enactment. If at this point the task’s precondition is true it will be executed normally, but if it is found to be false, the task will be "discarded" (and will not be activated again even if its precondition subsequently becomes true). |
| Post-conditions | A post-condition defines data that will automatically be added to the local database when the task has been performed. It is often used to specify information that will be needed by tasks that are “downstream” of the task in the workflow, such as a pre-condition of a later task. (This term may be confusing in the current version of the PROforma systems since they are not actually “conditions” to be checked but the assignment of values to data items. In future versions this behaviour may change.) |
PROforma worked example 1 – “Hello World”
- Select File > New (or click the New button on the toolbar
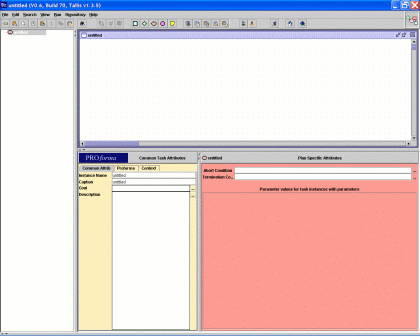
 ). This generates a sketch panel that is devoid of tasks. In fact this area represents a PROforma plan – currently called untitled – which we will use to contain whatever further tasks we need for our application (See Figure 4).
- Click on the Action button
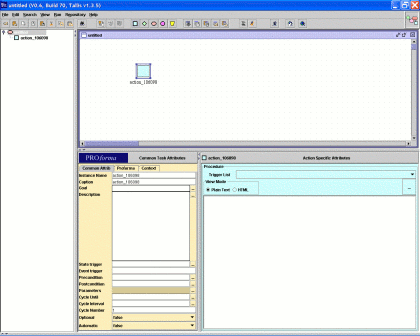
 in the toolbar (this represents an "action" task) and then again on your work area (the untitled plan). This should insert a new, undefined, action into this plan (see Figure 5).
 - To edit a task just select it by clicking on it to make its attribute fields visible (note that clicking on the white space around tasks displays the parent-plan task attributes.)
- Click on the white space (the untitled plan). The selected task is the top-level plan and you can now edit this task's attributes. Under the sketch area are a two panels, as outlined above, representing the common or “generic” attributes of all tasks and the distinguishing or “task-specific” attributes of the particular type of task.
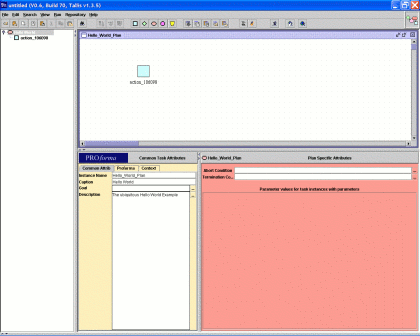
- In the Instance Name field (a common task attribute) type "Hello_World_Plan".
Note: this field cannot contain any spaces.
- Change the Caption to "Hello World" (note that this field can contain spaces).
- In the Description field type "The ubiquitous Hello World Example" (see Figure 6).
- Select the action task you created.
- Change the Instance Name to "Hello_World_Action" (again, this field is not allowed to contain any spaces).
- Change the Caption to "Say Hello" (this field can contain spaces).
- In the Description field type "This action will say hello".
- Finally, in the Procedure field (a specific attribute of "action" tasks) enter the text "HELLO WORLD!” (see Figure 7).
- Save your guideline as “Hello_World” by selecting File > Save (or click the Save button on the toolbar
 ).
).
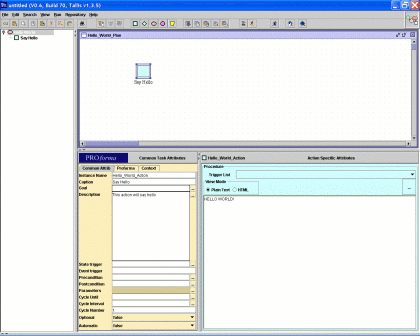
Figure 7: The attributes have been set for the Hello_World_Action action of the Hello_World plan
- You can now view the PROforma specification for your application by selecting View > Process Proforma Definition (or by clicking the View Proforma Definition button on the toolbar
 ).
). - You can run the application via your web browser by selecting Run > Run in Tester (or clicking the Run in Tester button on the toolbar
 ). This should invoke the Tester application that will allow you to test your guideline, viz: one plan containing one action (see Figure 8).
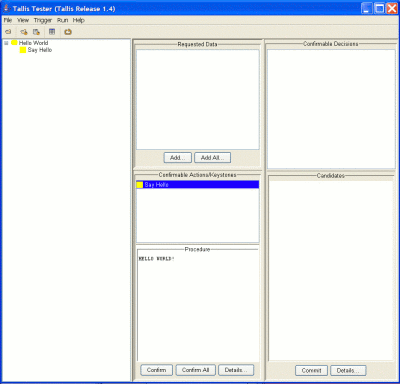
Figure 8: Testing the completed “HELLO WORLD!” process
PROforma worked example 2 – “Cancer Diagnosis”
- Create a new guideline with one enquiry task
 , one decision task
  and two action tasks
  .
. - Select the top-level plan (click on the white space in the work area) and change the following common task attributes:
Instance Name Cancer_Diagnosis_Plan Caption Check for cancer Description This simple plan checks the results of a biopsy to see if a patient has cancer
- Select the enquiry (click on the green diamond) and change the following common task attributes:
Instance Name Check_Results Caption Check biopsy Description Checks the biopsy results to confirm cancer
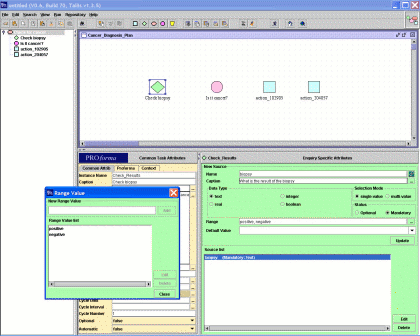
- Now modify the specific task attributes of the enquiry. Enter the following values in the New Source pane (see Figure 9):
Name biopsy Caption What is the result of the biopsy? Data Type Text
Note: This is the default settingSelection Mode Single-value
Note: This is the default setting
- Click the ellipsis button (...) to the right of the field to display the Range Value window.
- Type "positive" and click Add (or Enter)
Type "negative" and click Add (or Enter) - Close the window.
- Click Add to generate the source. This process generates a mandatory source test before the enquiry can proceed. When running, the engine will ask for the results of a biopsy and let you choose between positive and negative.
- Select the decision (click on the pink circle). Change the following common task attributes:
Instance Name Diagnosis Caption Is it cancer? Description Checks a biopsy to see if the patient has cancer or not
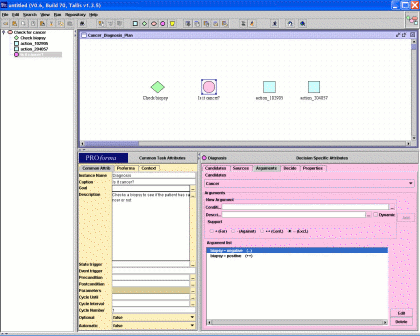
- Now modify the specific task attributes of the decision. Select the Candidates tab. In the Name field of the New Candidate pane:
- Type "Cancer" and click Add (or Enter)
Type "Further_tests" and click Add (or Enter)

- This has generated two options that the PROforma engine can recommend based on the information received via the Check_Results enquiry (see Figure 10).
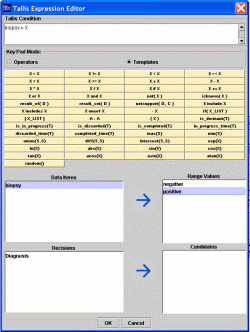
- Select the Arguments tab. In the Candidates drop-down list select Cancer (see Figure 11). In the Support field select the Confirming radio-button (++), then click the ellipsis button (...) to the right of the Condition field. This will display the Expression Editor. In the Key Pad Mode field of the Expression Editor select Templates.
- Double-click the X = X template button. This adds the assessment expression template to the input field of the Expression Editor.
- X = X is a default implementation of the expression and is meaningless in the current context. What we need to do is change the X’s to something of meaning within the current guideline. First select the X on the left hand side of the expression so that it is highlighted, then double-click on the biopsy item in the Data Items list. The X has now been replaced by biopsy.
- The possible values of biopsy are now displayed in the Range Values field. Highlight the remaining X in the assessment template and double-click on positive in the Range Values list (See Figure 12). The expression now reads biopsy = positive. Click the OK button to add this expression to the Condition field of the Cancer candidate.
- Click the Add button next to the Arguments field to add the expression to the Arguments list.
- Repeat the above steps but select the Excluding radio-button (--) and add the expression biopsy = negative to the Arguments field for the Cancer candidate of the Diagnosis decision task.
- In the Candidates drop-down list select Further_tests. In the Support field select the Confirming radio-button (++) and enter biopsy = negative in the Arguments field using the Expression Editor. Repeat this procedure but select the Excluding radio-button (--) and add biopsy = positive using the Expression Editor.
- Select the Decide tab. In the Candidates drop-down list select Cancer. A default recommendation rule appears in the Rule field. A default recommendation rule is set for Further_tests as well.
- This means that if the argument evaluated from the biopsy result is in favour of a particular candidate, this candidate is recommended.
- We will now add some scheduling constraints to the top-level plan. Move your mouse over the enquiry task; yellow squares should appear on each side of the task. Click on one and drag over the decision task. Release the mouse-button when over one of the decision's yellow squares, and a scheduling constraint is created. Repeat the process from the decision to each of the action tasks (see Figure 13).
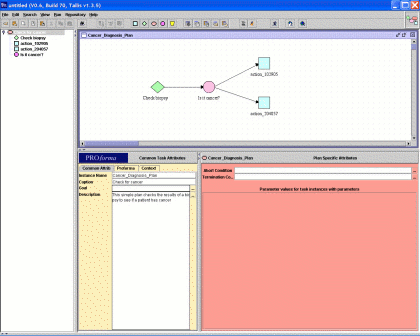
- These scheduling constraints specify that the tasks at the arrow-head end cannot be started until the task at the other end has been performed.
- We will now modify the attributes of one of the action tasks. Select one of the actions (click on one of the blue squares) and change the common task attributes as follows:
Instance Name Cancer_Treatment Caption Cancer diagnosed Description The biopsy results have proved positive - the patient has cancer
- Click the ellipsis button (...) to the right of the Precondition field to display the Expression Editor. In Template Mode, double-click the X = X template button. Replace the left hand X by highlighting it and double-clicking the result_of( D ) template button. Select the D of this expression and double-click Diagnosis in the Decisions list (See Figure 14). Select the remaining X and double-click Cancer in the Candidates list. The expression should now read result_of( Diagnosis ) = Cancer. Click the OK button of the Expression Editor to complete.
- Now change the specific task attributes of the Cancer_Treatment action by typing “Start the cancer treatment regime” in the Procedure field.
- This action will only be performed if the Cancer candidate is confirmed by the Diagnosis decision.
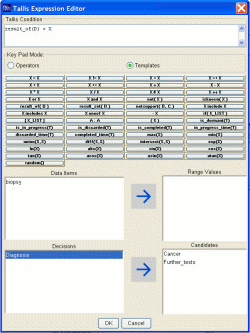
- We will now modify the attributes of the remaining action task. Select the remaining action and enter the following values:
Instance Name More_tests Caption Further tests required Description The biopsy results have proved negative - further tests will be required to provide a diagnosis Precondition result_of(Diagnosis) = Further_tests Procedure Start some further tests
- This action will only be performed if the Diagnosis decision selects the Further_tests candidate.
- Save and run the guideline (as detailed in steps 7 and 9 of the “Hello World” example). It should ask you for the result of the biopsy and direct you accordingly.
